 Pin It
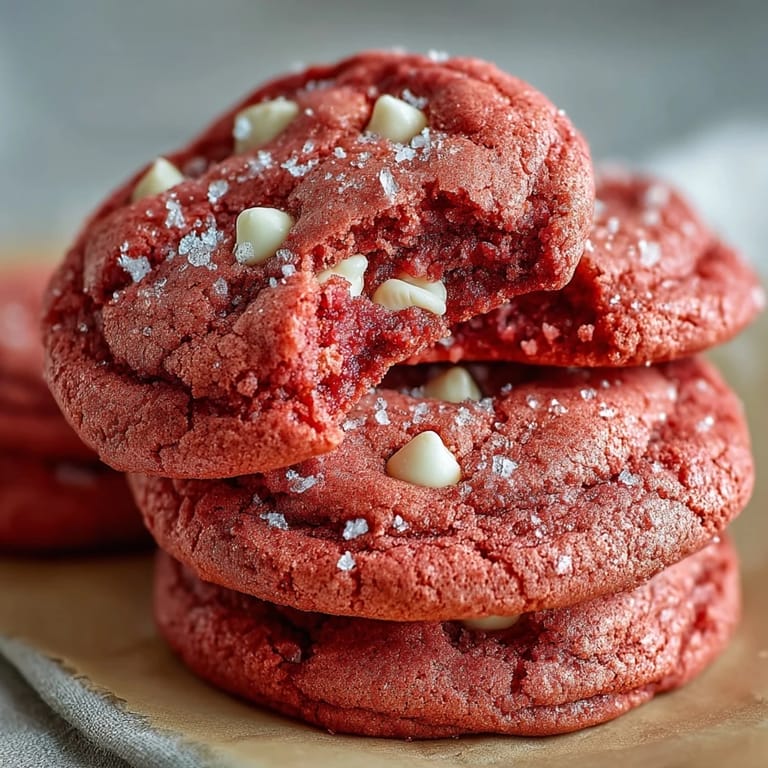
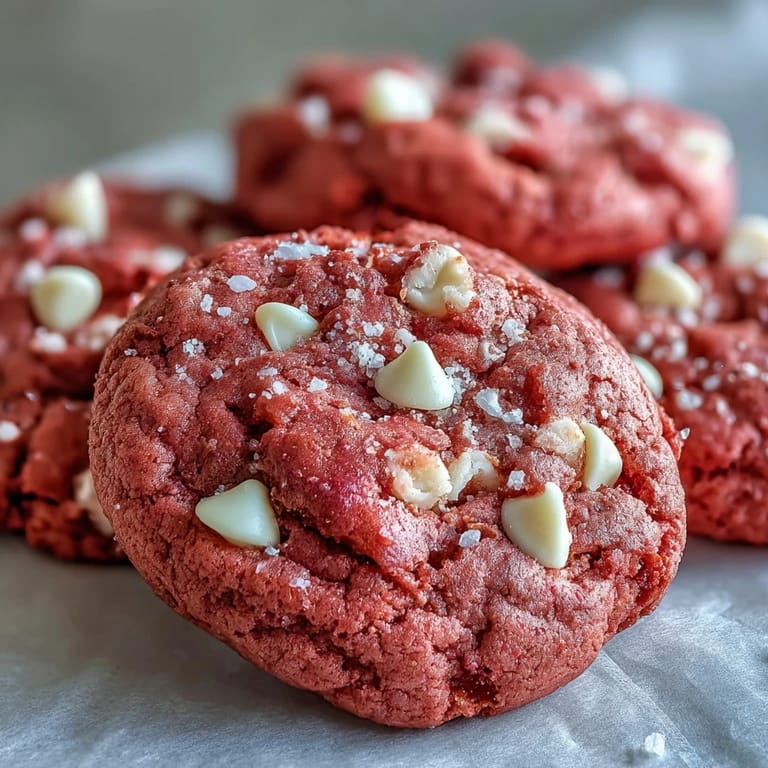
 The first batch came out looking like cotton candy had exploded in my oven, and I loved every second of it. I was testing colors for a baby shower and accidentally added twice the gel I meant to—the dough turned this electric, almost neon pink that made me laugh out loud. When they baked up soft and chewy with those little pockets of melted white chocolate, I knew I'd stumbled onto something that didn't need an occasion to exist. Sometimes the happiest accidents in the kitchen are the ones that make you smile before you even taste them.
I made these for my nieces birthday once, and she insisted we call them cloud cookies because of how soft they were. Watching a seven-year-old describe texture with that kind of wonder reminded me why baking for people you love never gets old. She ate three in a row and saved one in a napkin for later, which is basically the highest compliment a kid can give.
Ingredients
- All-purpose flour: The backbone of the cookie, giving just enough structure without making them cakey or dry.
- Baking powder and baking soda: This combo creates the perfect rise and chew—baking soda spreads them slightly, baking powder keeps them fluffy.
- Salt: A small amount that sharpens the sweetness and makes the white chocolate taste even richer.
- Unsalted butter: Softened to room temperature so it creams beautifully with the sugar, creating those airy pockets that keep the cookies tender.
- Granulated sugar: Creams with the butter to build structure and sweetness, plus it helps the edges get just a little crisp.
- Egg: Binds everything together and adds moisture, making sure the centers stay soft even after cooling.
- Vanilla extract: A warm, familiar base flavor that lets the pink color and white chocolate shine without competing.
- Pink gel food coloring: Gel is key here—liquid coloring will throw off the dough consistency, and gel gives you control over the intensity.
- White chocolate chips: They melt into creamy little pools and add just enough richness without overwhelming the cookie.
Tired of Takeout? 🥡
Get 10 meals you can make faster than delivery arrives. Seriously.
One email. No spam. Unsubscribe anytime.
Instructions
- Mix the Dry Ingredients:
- Whisk together the flour, baking powder, baking soda, and salt in a medium bowl until evenly distributed. This ensures every bite has the right balance of rise and flavor.
- Cream Butter and Sugar:
- Beat the softened butter and sugar with a mixer on medium-high speed for 2 to 3 minutes until the mixture turns pale and fluffy. This step is where the magic happens—you're building air into the dough that keeps the cookies soft.
- Add Egg, Vanilla, and Color:
- Beat in the egg and vanilla extract until smooth, then add the pink gel food coloring and mix until the dough is evenly tinted. Start with less color if you want pastel, more if you want bold.
- Combine Wet and Dry:
- Gradually add the dry ingredients to the wet mixture on low speed, mixing just until no flour streaks remain. Overmixing here can make the cookies tough, so stop as soon as it comes together.
- Fold in White Chocolate:
- Use a spatula to gently fold in the white chocolate chips, making sure they're evenly distributed throughout the dough. This is also when you can taste a tiny bit of dough if you're into that sort of thing.
- Chill the Dough:
- Cover the bowl with plastic wrap and refrigerate for 30 minutes. This step helps the cookies hold their shape and prevents them from spreading too thin in the oven.
- Preheat and Prep:
- Heat your oven to 350°F and line two baking sheets with parchment paper. Parchment keeps the bottoms from browning too fast and makes cleanup a breeze.
- Scoop and Space:
- Scoop tablespoon-sized balls of dough and place them about 2 inches apart on the prepared sheets. They'll spread just a little, so give them room to breathe.
- Bake Until Just Set:
- Bake for 10 to 12 minutes, until the edges look set but the centers still seem a bit soft and underbaked. They'll firm up as they cool, and this keeps them chewy inside.
- Cool and Enjoy:
- Let the cookies rest on the baking sheets for 5 minutes to set, then transfer them to a wire rack to cool completely. They're great warm, but the texture settles beautifully once cooled.
 Pin It
 There was a rainy Saturday afternoon when I made a double batch of these and left half the dough uncolored, just to see the difference. My friend came over, saw the pink ones cooling on the rack, and immediately grabbed one before I could even offer. She said they tasted like happiness looked, which is maybe the best review I've ever gotten.
Storing and Keeping Them Fresh
These cookies stay soft and chewy for up to a week in an airtight container at room temperature. I like to tuck a piece of bread in with them—sounds weird, but it keeps them from drying out. If you want to freeze the dough, scoop it into balls first, freeze them on a tray, then transfer to a freezer bag. You can bake them straight from frozen, just add a minute or two to the baking time.
Flavor Variations Worth Trying
A few drops of almond extract in place of some of the vanilla gives them a subtle, almost marzipan-like note that pairs beautifully with the white chocolate. Rose water is another option if you want something floral and unexpected—just go easy, a little goes a long way. I've also folded in freeze-dried strawberries for a pop of tartness and extra color, and it worked better than I expected.
Making Them Your Own
You can press a few extra white chocolate chips on top of each dough ball right before baking to make them look bakery-perfect. If you want to turn them into cookie sandwiches, let them cool completely and spread cream cheese frosting between two cookies—it's indulgent and surprisingly elegant. For a gluten-free version, swap the all-purpose flour with a 1:1 gluten-free blend, and you won't notice much difference in texture.
- Try sprinkling a tiny pinch of flaky sea salt on top right after they come out of the oven for a sweet-salty contrast.
- If you don't have white chocolate chips, chopped white chocolate bars work just as well and sometimes melt even better.
- Don't open the oven door during the first 8 minutes of baking, or the cookies might collapse in the center.
 Pin It
 These cookies don't need a special reason to exist, but they have a way of turning ordinary moments into something a little brighter. Bake them when you need a smile, or when someone you love could use one too.
Recipe FAQs
- → Why is chilling the dough important?
Chilling for 30 minutes prevents spreading too much in the oven, ensures even baking, and enhances the overall flavor development.
- → Can I use liquid food coloring instead of gel?
Gel coloring works best as it doesn't add excess moisture. If using liquid, start with a few drops and reduce other liquids slightly to maintain dough consistency.
- → How do I know when they're done baking?
Look for set edges while centers remain slightly soft. They'll appear slightly underbaked but will firm up perfectly during the 5-minute cooling period on the baking sheet.
- → Can I freeze the dough?
Yes, scoop dough balls onto a baking sheet, freeze until solid, then transfer to an airtight container. Bake from frozen, adding 1-2 extra minutes.
- → What's the best way to store these?
Keep in an airtight container at room temperature for up to one week. For longer storage, freeze baked cookies for up to three months.
- → Can I make these gluten-free?
Substitute the all-purpose flour with a 1:1 gluten-free baking blend. The texture and taste remain remarkably similar.